
Using Threads with VisiBroker
Threads in an Object Implementation
Threads in a Client Application
Linking Multi-threaded Applications
Integration with the Windows/NT Event Loop
Integration with Microsoft Foundation Classes
Multithreaded Servers: Windows 95 and Windows NT
Using Threads with VisiBroker
For platforms that support threads, VisiBroker provides two sets of libraries; a single-threaded library and another library that is thread-safe and re-entrant. In addition to providing thread-safe facilities for client applications, the multi-threaded version of the library results in the internal use of threads by the VisiBroker core. Threads in an Object Implementation
In the multi-threaded version of VisiBroker, the main thread of an object implementation is responsible for initializing the ORB and BOA. The main thread then waits for connection requests from client applications. Each time a client connection request is received, a new worker thread is spawned within the object implementation to perform all processing for that client. When the client application destroys the connection, the worker thread exits. If several clients access the object implementation at one time, worker threads will be created for each client.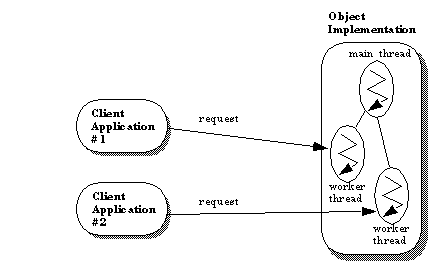
Threads in a Client Application
Client applications can use threads in two ways in relation to an object implementation. The client can use the object reference returned from a single bind in all of the threads it creates. Alternatively, each thread within the client can issue its own bind request. One Bind with Multiple Client Threads
If your client application issues a single bind and then spawns several threads, it can pass the object reference received from the bind to each thread. A single connection to the object implementation is established and all client worker threads utilize a single worker thread in the object implementation.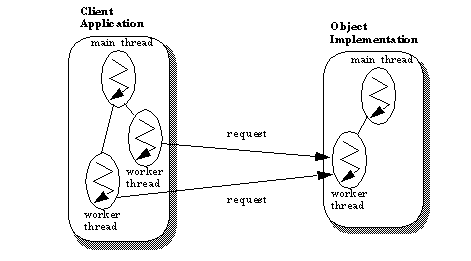
Multiple Binds with Multiple Client Threads
Your client application can spawn several threads and have each thread issue its own bind request to the object implementation. In this case, VisiBroker will establish a separate connection to the object implementation for each client thread and the object implementation will create a worker thread for each client worker thread. This arrangement allows for maximum efficiency because if one client thread issues a blocking request it will not block other client threads that are accessing the same object implementation.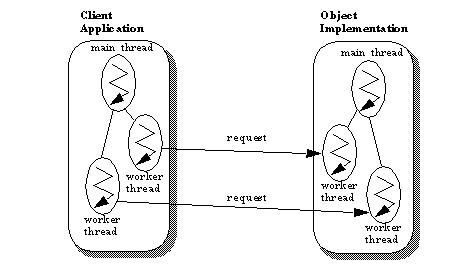
Multiple Threads with Cloning
Cloning is another technique for achieving a separate object implementation worker thread for each client worker thread. Using this approach, the main thread binds to the object and passes the object reference to each client worker thread it creates. A client worker thread then invokes the _clone method on the object reference, resulting in a new connection with the object implementation and the spawning of a new worker thread. You should remember that the _duplicate method increases the reference count to the object and that _clone makes a complete copy of the object reference and results in a new, separate connection. Linking Multi-threaded Applications
All the re-entrant versions of the VisiBroker libraries, regardless of platform, have a "_r" suffix. Event Loop Integration
When your object implementation invokes the BOA::impl_is_ready method, an event loop is entered that waits for the arrival of requests from client applications. Your object implementation may also need to interact with another event-driven system. In a multi-threaded environment, you can solve this problem by simply using two threads; one thread waits for VisiBroker events and the other thread services other events. If your platform does not support threads, you may find it helpful to integrate all event driven processing by using the Dispatcher and IOHandler classes. The Dispatcher Class
This class is designed to detect events on several file descriptors and dispatch those events to the appropriate handler. The Dispatcher maintains three lists of file descriptors; one list for reading data, one list for writing data and one for exceptions. You can use the link method to add a file descriptor to one of the Dispatcher class' lists and define the IOHandler object to be called to handle events on that file descriptor. You can find the include file for the Dispatcher class in include/dispatcher/dispatch.h.Dispatcher class and the static instance method is provided to create the object, if necessary, and return a pointer to it.
class Dispatcher {
	public:
		enum DispatcherMask {
			ReadMask,
			WriteMask,
			ExceptMask
		};

	Dispatcher();
	virtual ~Dispatcher();

	virtual void			link(int fd, DispatcherMask, IOHandler*);
	virtual IOHandler		handler(int fd, DispatcherMask) const;
	virtual void			unlink(int fd);

	virtual void			startTimer(long sec, long usec, IOHandler*);
	virtual void 			stopTimer(IOHandler*);

	virtual iv_boolean		dispatch(long& sec, long& usec);
	virtual iv_boolean		dispatch(timeval *);
	virtual iv_boolean		dispatch();

	static Dispatcher&		instance();

	...
};
link method to add a file descriptor to the Dispatcher, you specify the file descriptor, the DispatcherMask and a pointer to an IOHandler object. The DispatcherMask value determines whether the file descriptor is added to the read, write or exception event list.When an event occurs on the file descriptor, the
Dispatcher will invoke the appropriate IOHandler method to service the event. The IOHandler object provides methods for reading data from or writing data to a file descriptor as well as for handling exceptions and expired timers. If an IOHandler method returns a negative value indicating it encountered an error, the Dispatcher will automatically unlink the IOHandler from its file descriptor.Note: You must make multiple invocations of the link method if you want a particular file descriptor to be placed in more than one of the dispatcher's lists. DispatcherMask values cannot be ordered together when calling
link.You can use the handler method to return the IOHandler object defined for a particular file descriptor and DispatcherMask combination.
IOHandler object by invoking the startTimer method. This method lets you specify a time interval in a combination of seconds and microseconds. When the interval expires, the IOHandler object's timerExpired method is invoked.The Dispatcher method stopTimer can be called to stop a timer.Note: Timers are one shot, not periodic-you have to set them again if you want to time another interval.
The use of the timer methods can be especially useful in single-threaded environments. Multi-threaded applications have the flexibility of starting timers in separate threads.
dispatch method accepts no arguments and blocks indefinitely or until an event occurs on one of its file descriptors. If a file descriptor event occurs, the appropriate IOHandler method is invoked before the dispatch method returns.The other two forms of the
dispatch method accept a time interval specification. If the time interval specified is zero, the Dispatcher will return immediately after checking all the file descriptors and timers. If the time interval is greater than zero, the Dispatcher will block until an event occurs on one of the file descriptors or until the time interval expires. The dispatch method returns a one if an event on a file descriptor caused the return. This method returns a zero if an expired timer caused the dispatch method to return.
unlink method removes the specified file descriptor from all lists maintained by the Dispatcher.
IOHandler class to handle events on a particular file descriptor. You associate your IOHandler object with a file descriptor, using the Dispatcher object's link method.You can find the include file for this
IOHandler in the following location:
class IOHandler {
	protected:
		IOHandler();
	public:
		virtual	~IOHandler();
		virtual int	inputReady(int fd);
		virtual int	outputReady(int fd);
		virtual int	exceptionRaised(int fd);
		virtual void	timerExpired(long sec, long usec);
};
Dispatcher class assumes your methods will follow.
The following section describes the IOHandler class methods. The method name is given first followed by the description.
Using an IOHandler
To create your own IOHandler, simply derive your own class and implement those methods you intend to use. Figure 8-8shows an example IOHandler-derived class.
#include <dispatch/iohandle.h>
...

class MyHandler : public IOHandler
{
	public:
		MyHandler();
		virtual ~MyHandler();
		virtual int inputReady(int fd) {
			// read from file using fd
			...
			if(done) {
				return(0);
			} else if(more_left_to_read) {
				return(1);
			} else if(failure) {
				return(-1);
			}
		}
	...
The following example shows how you might instantiate your handler and link it to a file descriptor. In this example, when an input event occurs on myfd the dispatcher will call my_handler::inputReady method to handle the event.
...

MyHandler my_handler;
Dispatcher &disp = Dispatcher::instance();
disp.link(myfd, Dispatcher::ReadMask, my_handler);

...
For UNIX, VisiBroker provides an
XDispatcher class that you can use to integrate your application with the XWindows XtMainLoop. The XDispatcher registers the file descriptors it uses for its connections with the Xt event loop and installs the appropriate event handlers. The result is that the Xt event loop receives and dispatches events for both XWindow and VisiBroker events. When an event occurs on one of VisiBroker's file descriptors, the Xt event loop will call the appropriate VisiBroker method to process the data.The following example shows how you might use the
XDispatcher class in you object implementation. Applications that use the XDispatcher class should link with the library libxdispatch.a in addition to all the other appropriate VisiBroker libraries.
#include <dispatch/xdisp.h>int main(int argc, char * const *argv)
{
// Instantiate XDispatcher before invoking any VisiBroker methods.
XDispatcher xdisp;
// Initialize ORB and BOA.
CORBA::ORB_ptr orb = CORBA::ORB_init(argc, argv);
CORBA::BOA_ptr boa = orb->BOA_init(argc, argv);
...
boa->impl_is_ready();
// You can call XtMainLoop() instead of impl_is_ready().
...
}
For Windows NT, VisiBroker provides a
WDispatcher class that you can use to integrate VisiBroker events with Windows message events. The WDispatcher must be instantiated before any ORB object implementations are instantiated and before ORB or BOA methods are invoked. When you instantiate the WDispatcher object, you must pass it the window handle.Note: There are significant advantages to building a multithreaded server rather than integrating the orb with the Windows event loop. For more information, see Multithreaded Servers and Windows 95/Windows NT later in this document.
The following example shows how to use the
WDispatcher class with the Windows event loop.
#include <dispatch/wdisp.h>...
// Windows main entry point
WINAPI WinMain(HINSTANCE hInstance, HINSTANCE hPrevInstance, LPSTR,
int nCmdShow)
{
static char szAppName[] = "Library";
HWND hwnd;
MSG msg;
WNDCLASS wndclass;
// Initialize wndclass
...
hwnd = CreateWindow(szAppName, "LibraryServer", WS_OVERLAPPEDWINDOW,
CW_USEDEFAULT, CW_USEDEFAULT, 200, 200,
NULL, NULL, hInstance, NULL);
WDispatech *winDispatechr = new WDispatcher(hwnd); CORBA::ORB_var orb = CORBA::ORB_init(__argc, __argv);
CORBA::BOA_var orb = orb->BOA_init(__argc, __argv);
Library server("Harvard");
boa->obj_is_ready(&server);
ShowWindow(hwnd, nCmdShow);
UpdateWindow(hwnd);
// Enter message loop
while(GetMessage(&msy, NULL, 0, 0) ) {
TranslateMessage(&msg);
DispatchMessage(&msg);
}
return msg.wParam;
}
You may also use the WDispatcher class when developing client applications with the Microsoft Foundation Classes. When you derive your application class from the Microsoft CWinApp class, you need to provide an InitInstance method. The WDispatcher object should be instantiated in the InitInstance method.
#include <afxwin.h>#include <dispatch/wdisp.h>
...
// Application class
class LibraryClientApp : public CWinApp
{
public:
BOOL InitInstance();
};
BOOL LibraryClientApp::InitInstance()
{
m_pMainWnd = new MainWindow;
m_pMainWnd->showWindow(m_nCmdShow);
m_pMainWnd->UpdateWindow();
// WDispatcher instantiation goes here?
WDispatcher *winDispatcher = new WDispatcher(m_pMainWnd);
CORBA::ORB_var orb = CORBA::ORB_init(__argc, __argv);
return 1;
}
...
The following code example shows how to initialize the orb for a multithreaded Win32 server without using MFC.
// Windows main entry pointThis example is identical to the preceding WDispatcher example, except it does not create a WDispatcher object. The event loop handles normal Windows messages as usual. Orb requests, however, do not flow through the event loop. Rather, the orb automatically creates worker threads when a request comes in. These threads are completely independent of the Windows event loop.WINAPI WinMain(HINSTANCE hInstance, HINSTANCE hPrevInstance, LPSTR,
int nCmdShow)
{
static char szAppName[] = "Library";
HWND hwnd;
MSG msg;
WNDCLASS wndclass;
// Initialize wndclass
...
hwnd = CreateWindow(szAppName, "LibraryServer", WS_OVERLAPPEDWINDOW,
CW_USEDEFAULT, CW_USEDEFAULT, 200, 200,
NULL, NULL, hInstance, NULL);
CORBA::ORB_var orb = CORBA::ORB_init(__argc, __argv);
CORBA::BOA_var orb = orb->BOA_init(__argc, __argv);
Library server("Harvard");
boa->obj_is_ready(&server);
ShowWindow(hwnd, nCmdShow);
UpdateWindow(hwnd);
// Enter message loop
while(GetMessage(&msy, NULL, 0, 0) ) {
TranslateMessage(&msg);
DispatchMessage(&msg);
}
return msg.wParam;
}
Creating a multithreaded server using MFC is equally straightforward:
#include <stdafx.h>The InitInstance() method provides all orb initialization. After initializing the orb and boa objects, the initialization code creates the Library object and declares the object is ready....
// Application class
class LibraryClientApp : public CWinApp
{
public:
BOOL InitInstance();
};
BOOL LibraryClientApp::InitInstance()
{
m_pMainWnd = new MainWindow;
m_pMainWnd->showWindow(m_nCmdShow);
m_pMainWnd->UpdateWindow();
CORBA::ORB_var orb = CORBA::ORB_init(__argc, __argv);
CORBA::BOA_var boa = orb->BOA_init(__argc, __argv);
Library server("Harvard");
boa->obj_is_ready(&server);
return 1;
}
...
Whether the server is built directly on the Win32 API or using MFC, the multithreaded
Developers must take special care when accessing a system-wide resource within an object implementation. For example, many database access methods are not thread-safe. If an object implementation must access such a database, it must lock access to the resource using a mutex or critical section.
A key point in building a multithreaded server with an MFC-based Windows user interface is that only certain threads may do user interface update. Within an MFC application, either the main application thread or a CWinThread-derived class that the application created may do user interface updates. These restrictions are because MFC threads contain thread-local storage important in doing user interface updates. Performing a user interface update from a non-MFC thread causes errors because the system does not have the required local storage within the thread.
Because VisiBroker for C++ creates a worker thread for each incoming connection, these threads are not MFC threads. Such a worker thread cannot perform user interface updates directly.
It is straightforward to interface between VisiBroker threads and MFC threads. The
For example, a server needs to update the user interface when it handles a request. The object implementation that handles the request updates a shared data structure that contains the request count. It then posts a WM_PAINT message to the window to paint. In an MFC-based server, the worker thread can call the MFC function CWnd::Invalidate() to post the WM_PAINT message.
In either case, the window's painting code accesses the common data structure containing the needed counter and repaints the window. Because the window updates in response to a message, the painting occurs within the window's own thread.
The counter data structure is a global resource shared between threads. All code updating the counter must synchronize accesses with a mutex or a critical section. Within an MFC-based server, the classes derived from CSyncObject provide C++ wrappers for Win32 mutexes and critical sections.
class MyDispatcher : public Dispatcher{
public:
MyDispatcher();
virtual ~MyDispatcher();
virtual void link(int fd, DispatcherMask, IOHandler*);
virtual IOHandler* handler(int fd, DispatcherMask) const;
virtual void ulink(int fd);
virtual void startTimer(long sec, long usec, IOHandler *);
virtual void stopTimer(IOHandler *);
virtual iv_boolean setReady(int, DispatcherMask)
{ return 0; } // No need to implement
virtual void dispatch();
virtual iv_boolean dispatch(long&, long& )
{ return 0; } // No need to implement
virtual iv_boolean dispatch(timeval *val);
private:
...
};